> ## Documentation Index
> Fetch the complete documentation index at: https://docs.apptics.com/llms.txt
> Use this file to discover all available pages before exploring further.
# Connect a store without adding Apptics to Shopify
> Create the Shopify app yourself and add Apptics checkout to your theme by hand
This is the alternative to [Link your Shopify store](/getting-started/link-your-shopify-store)
for stores that can't add Apptics as a user of their Shopify account — for
example when your Shopify plan has no free user seat. You create the app in
Shopify yourself and add Apptics checkout to your theme by hand. Plan on
about 15 minutes and admin access to your Shopify store.
## Add your store in Apptics
In Apptics, click **Add store**, enter your `your-store.myshopify.com`
domain, and click **Continue**. Leave the window at the **Give Apptics
access** step — you'll come back to it at the end.
## Create the app in Shopify
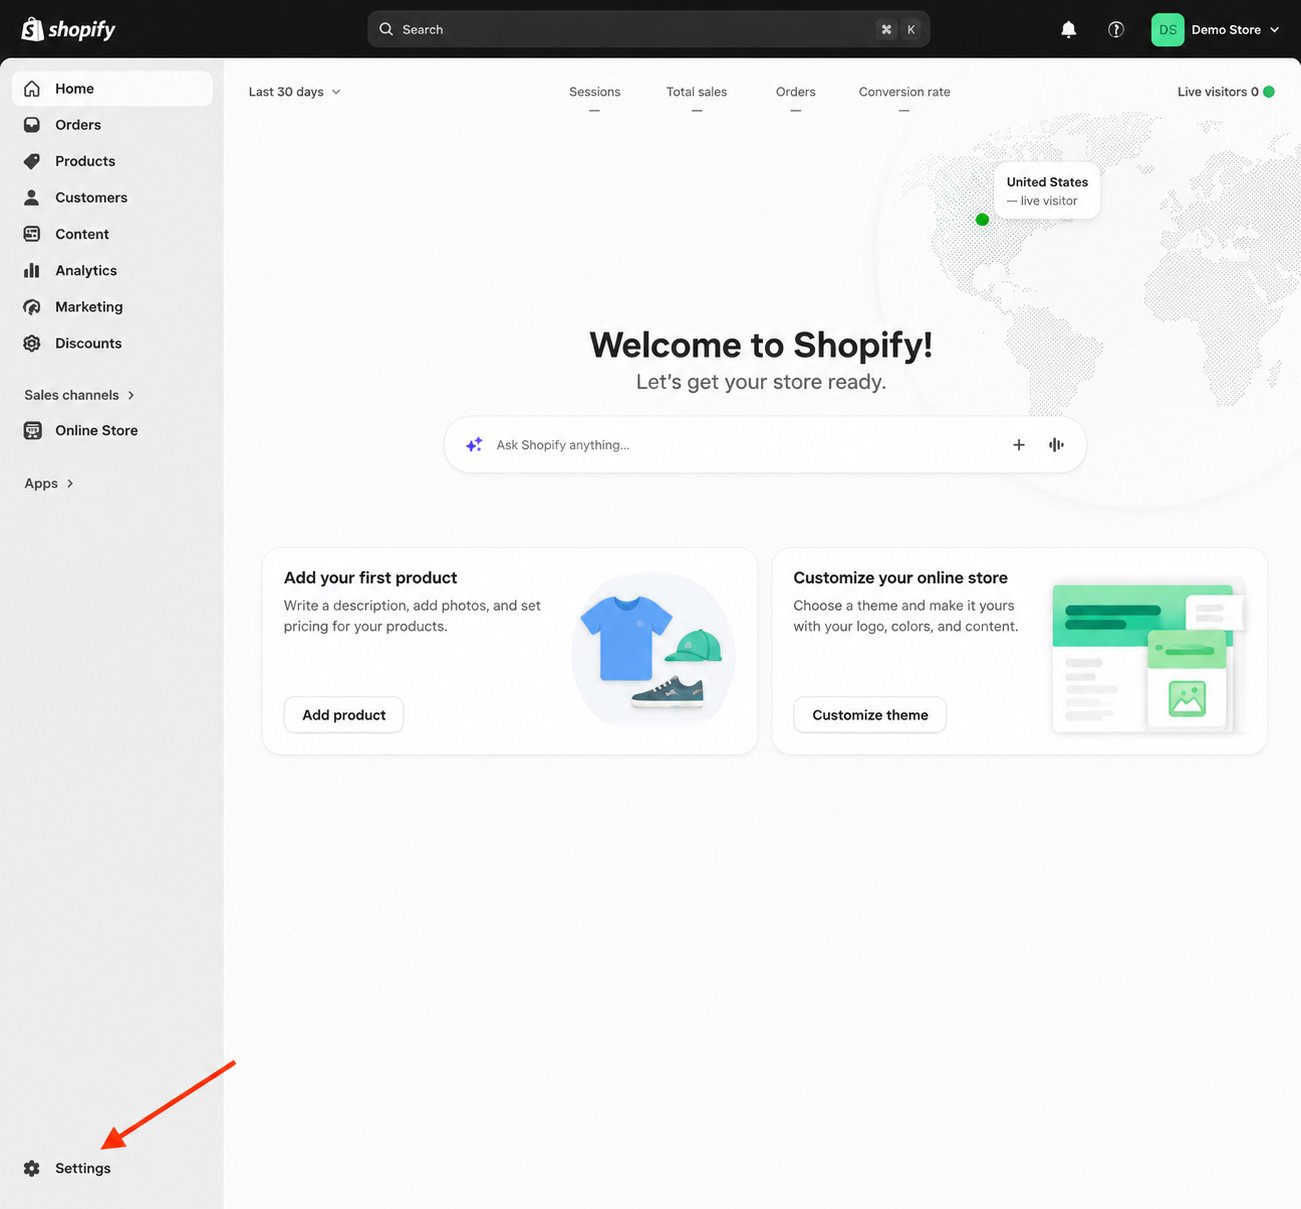
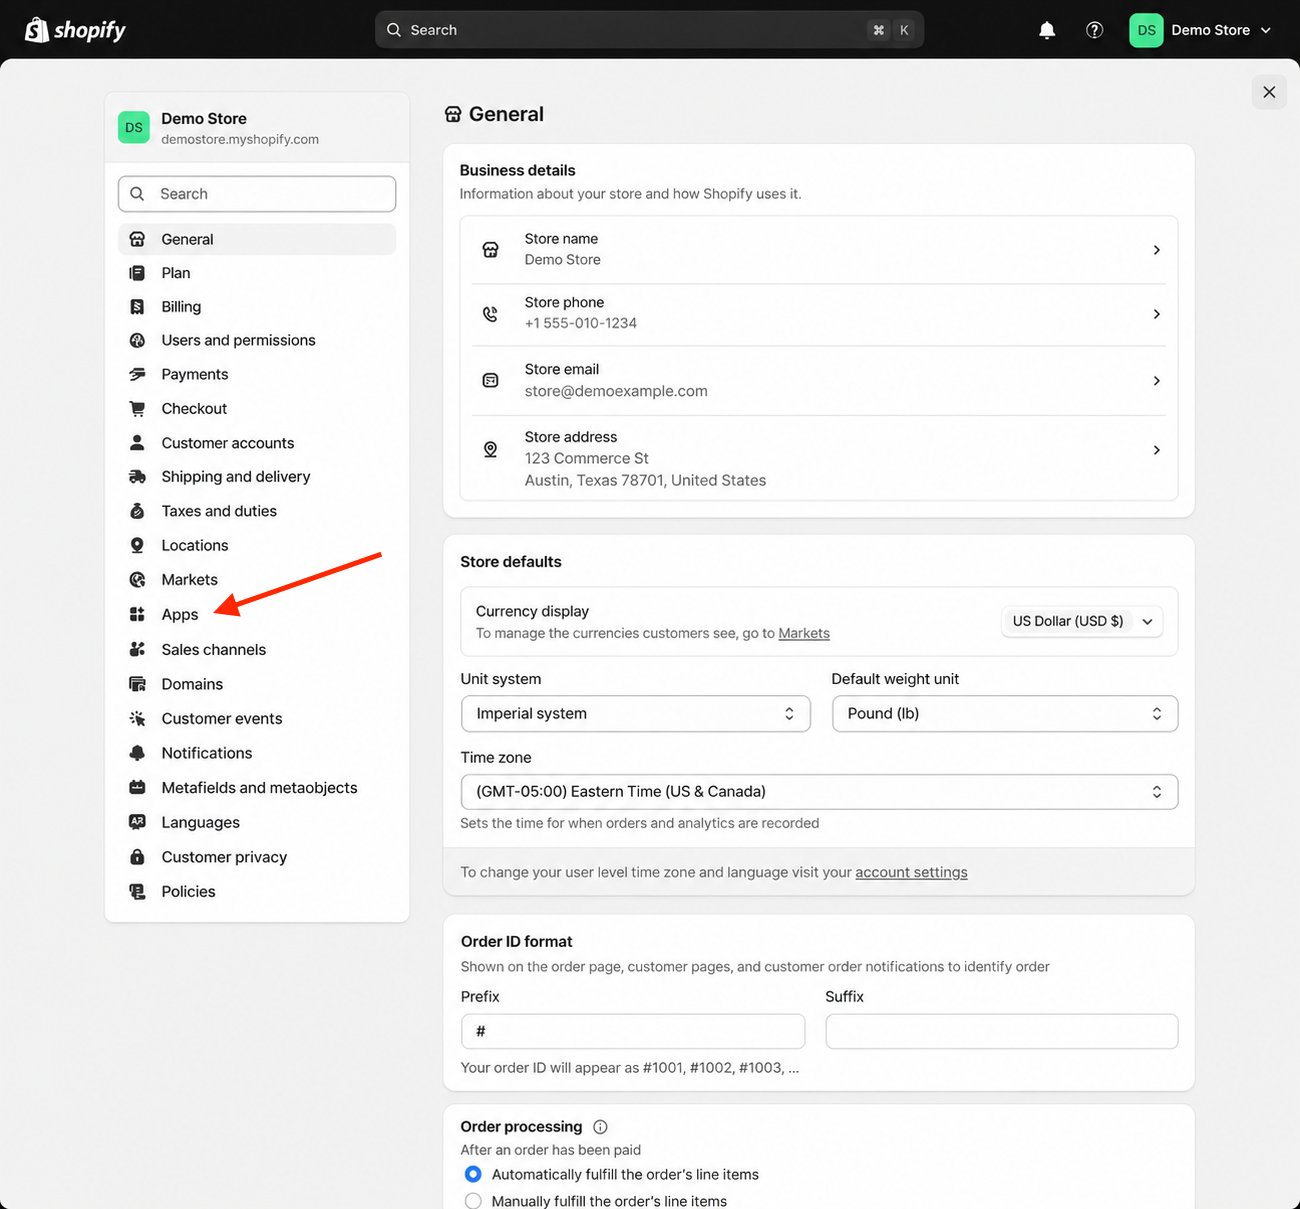
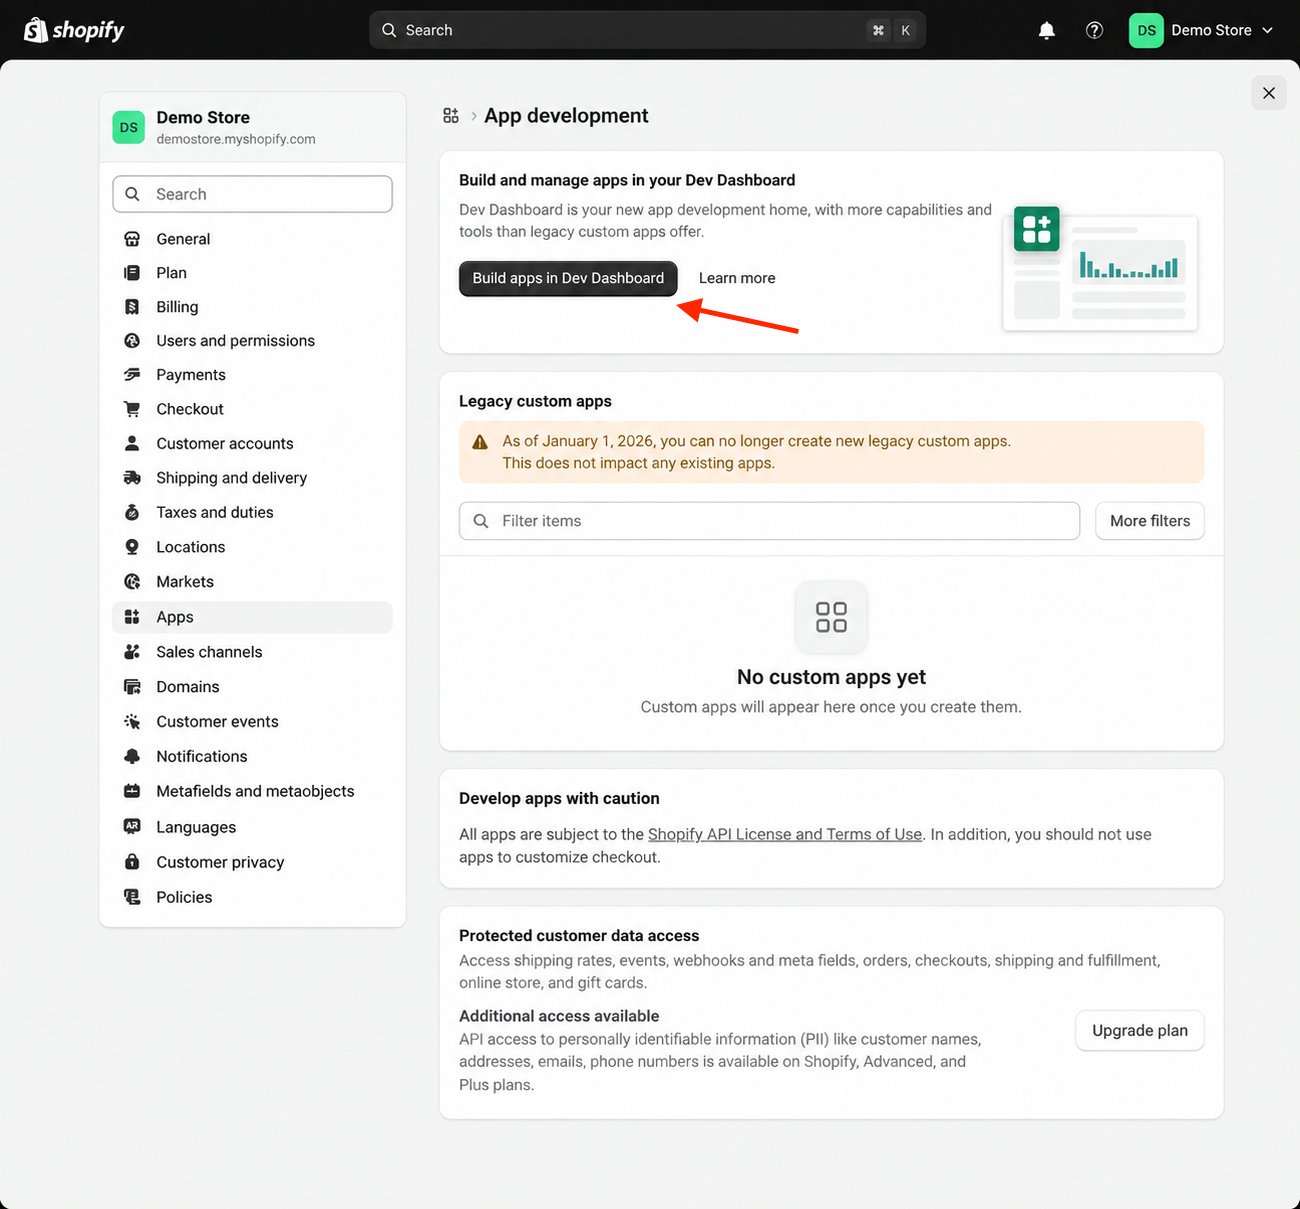
1. In your Shopify admin, open **Settings**, then **Apps**, then **Build apps
in Dev Dashboard**.
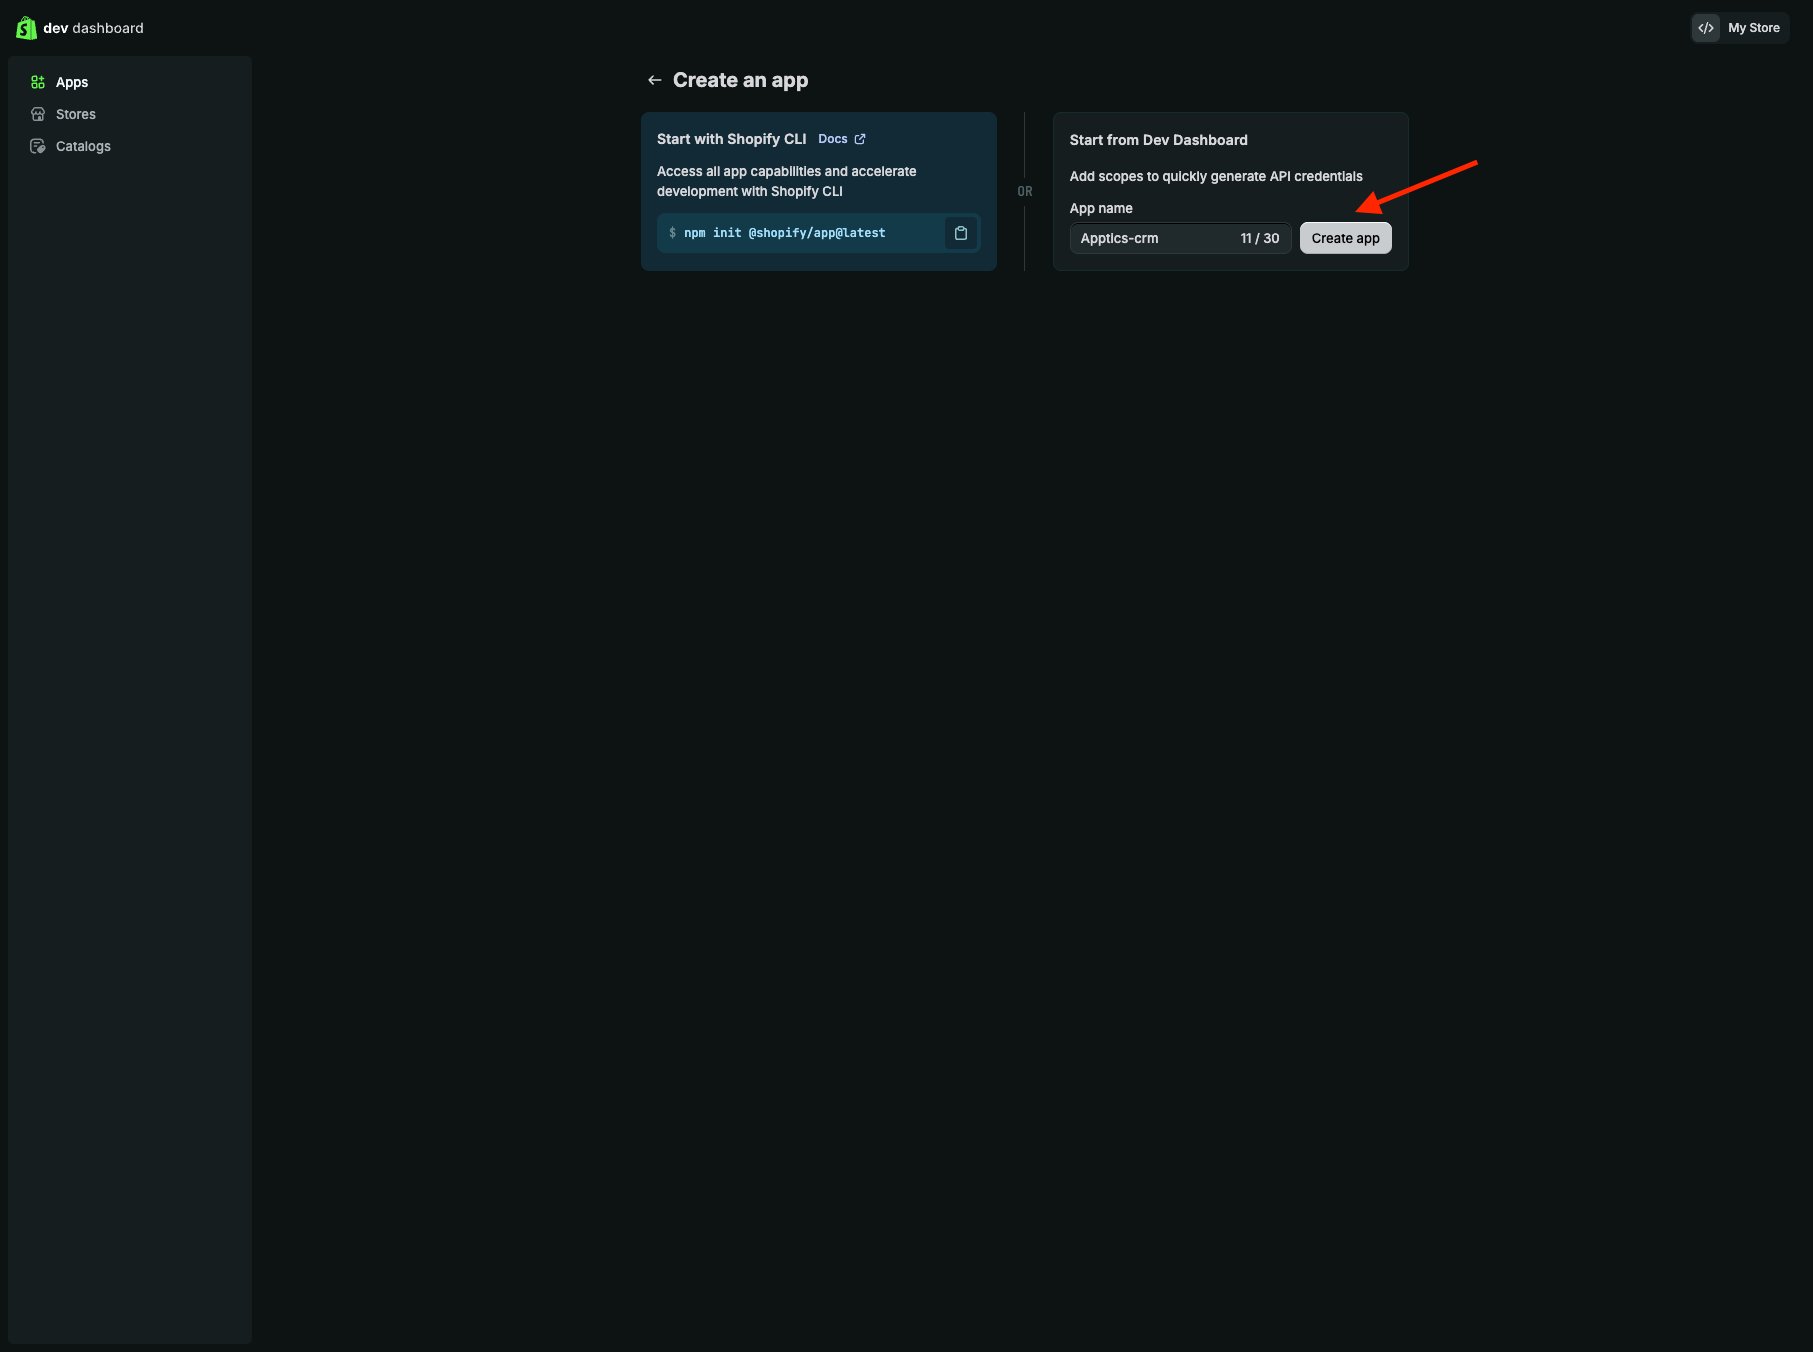
 2. In the dev dashboard, create a new app (name it `Apptics checkout`) and
start a new version.
2. In the dev dashboard, create a new app (name it `Apptics checkout`) and
start a new version.
 3. Set the **App URL** to `https://app.apptics.com`.
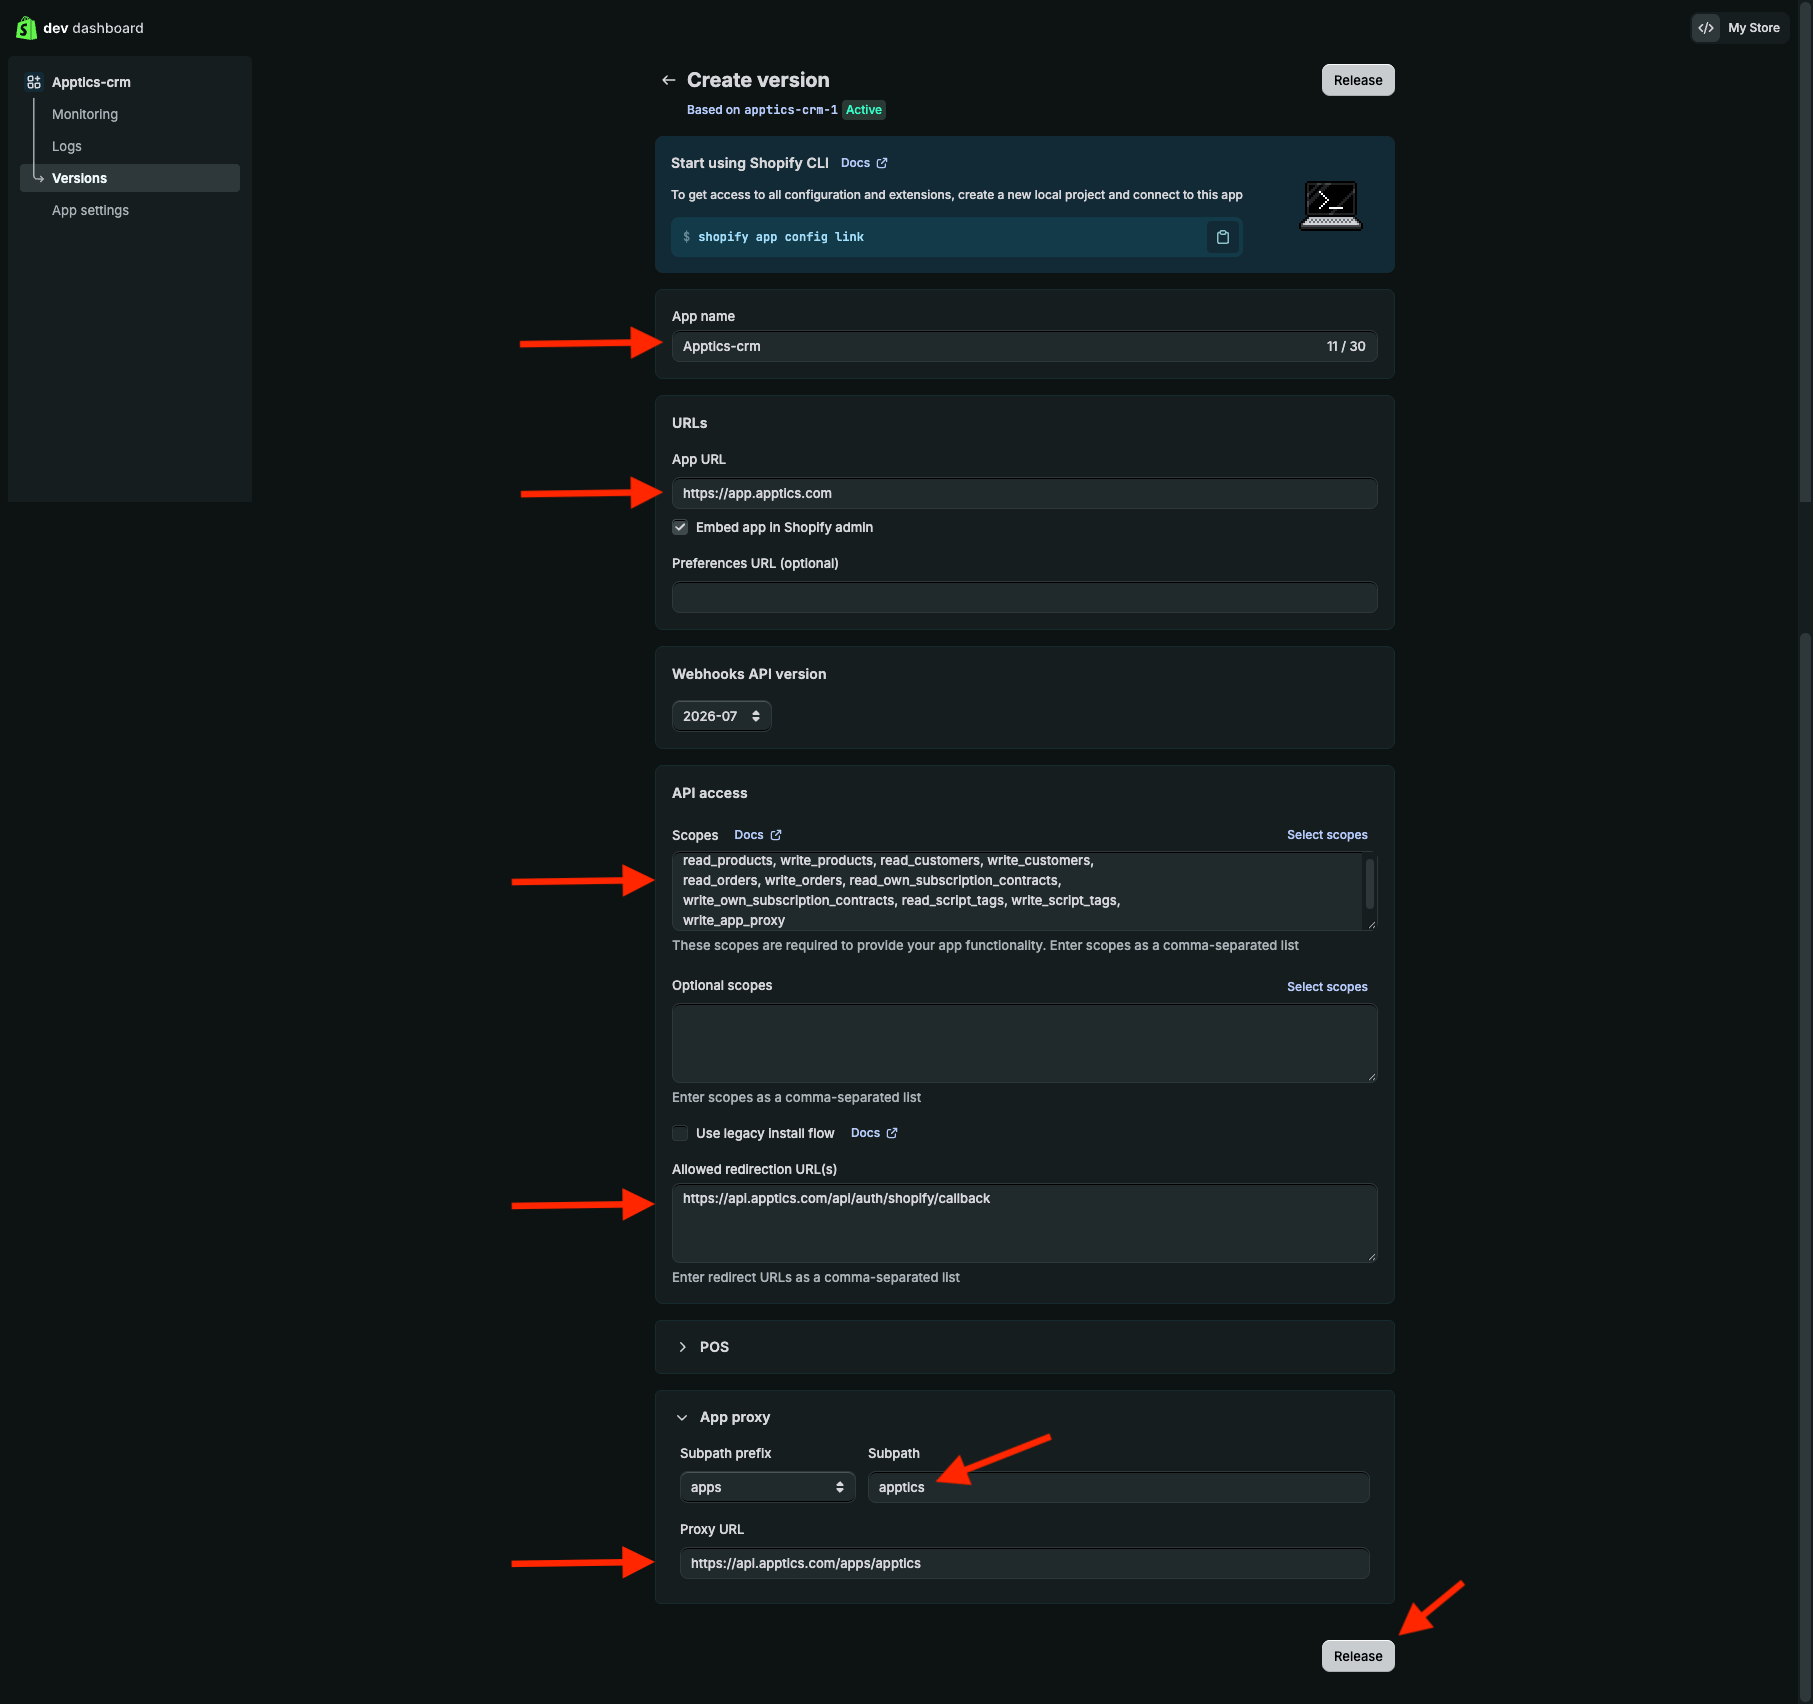 4. Under **API access**, paste the scopes:
```
read_products, read_customers, write_customers, read_orders, write_orders,
read_discounts, read_own_subscription_contracts,
write_own_subscription_contracts, read_online_store_navigation,
write_online_store_navigation, read_themes
```
and add the redirect URL
`https://api.apptics.com/api/auth/shopify/callback`.
5. Under **App proxy**, set subpath prefix `apps`, subpath `apptics`, and
proxy URL `https://api.apptics.com/apps/apptics`.
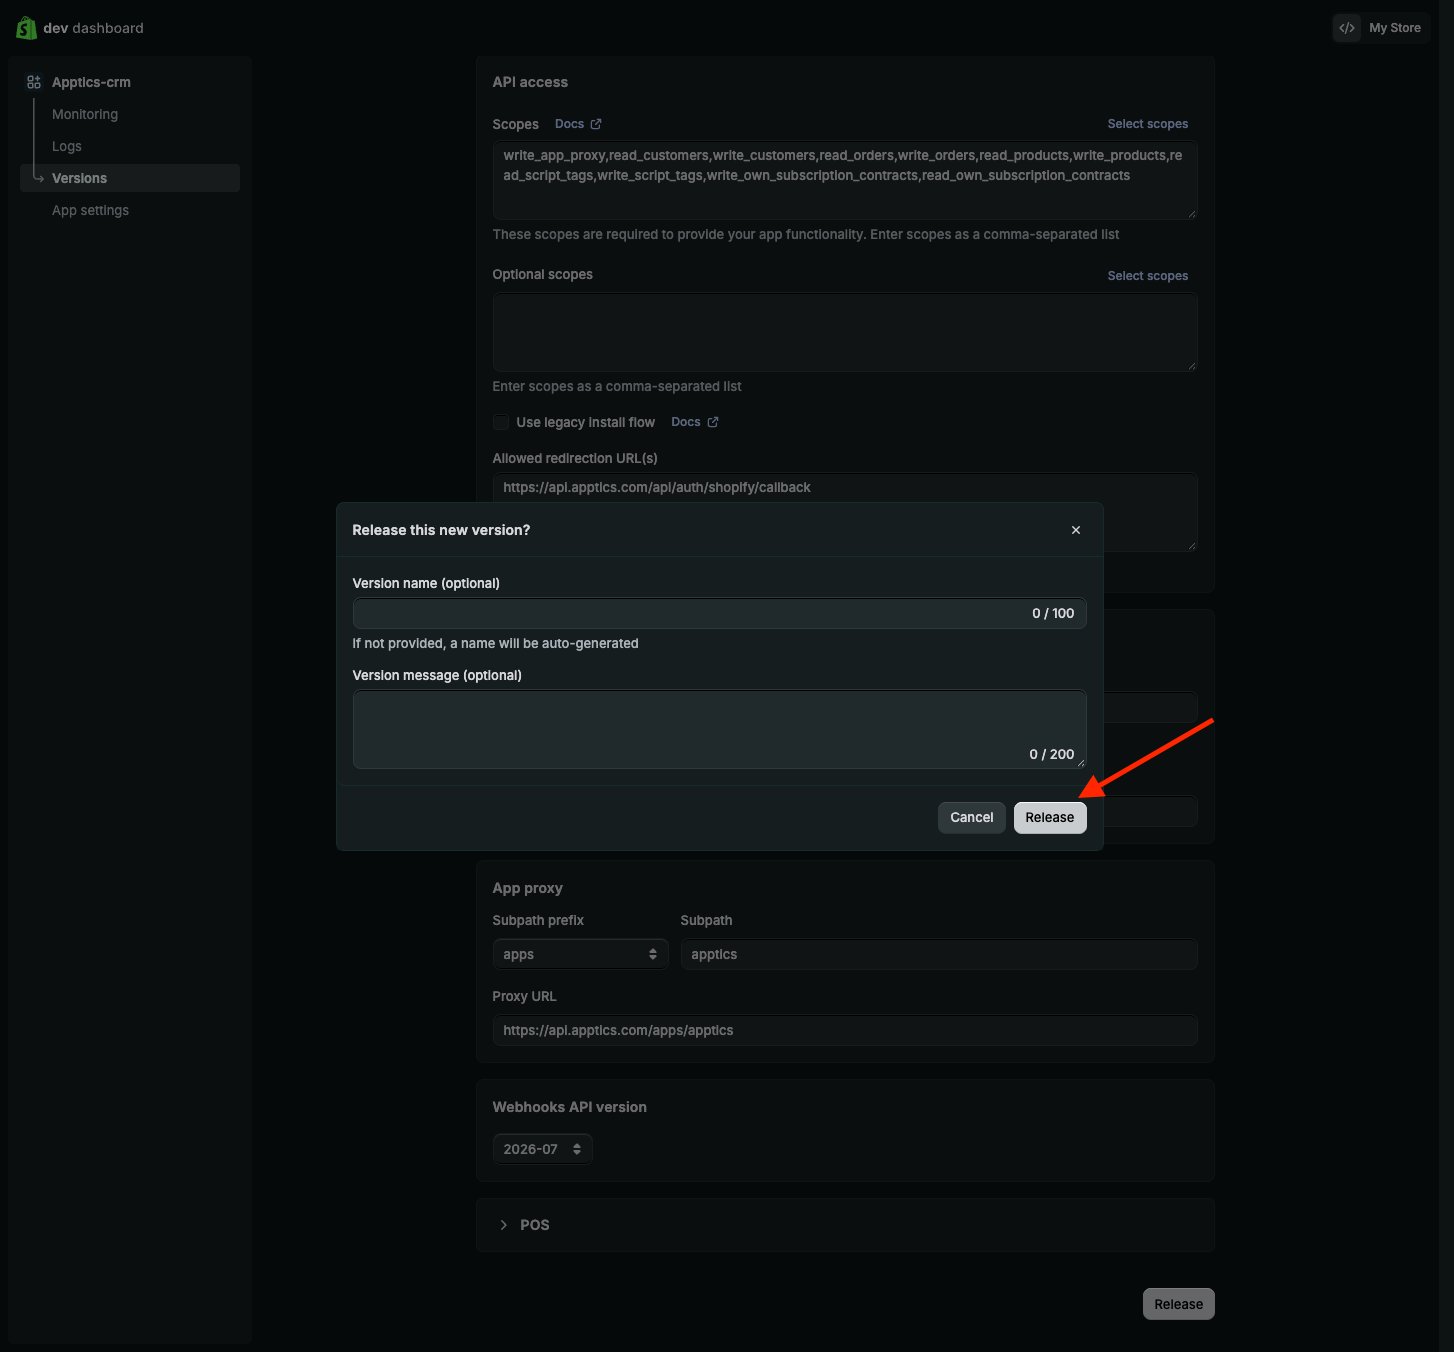
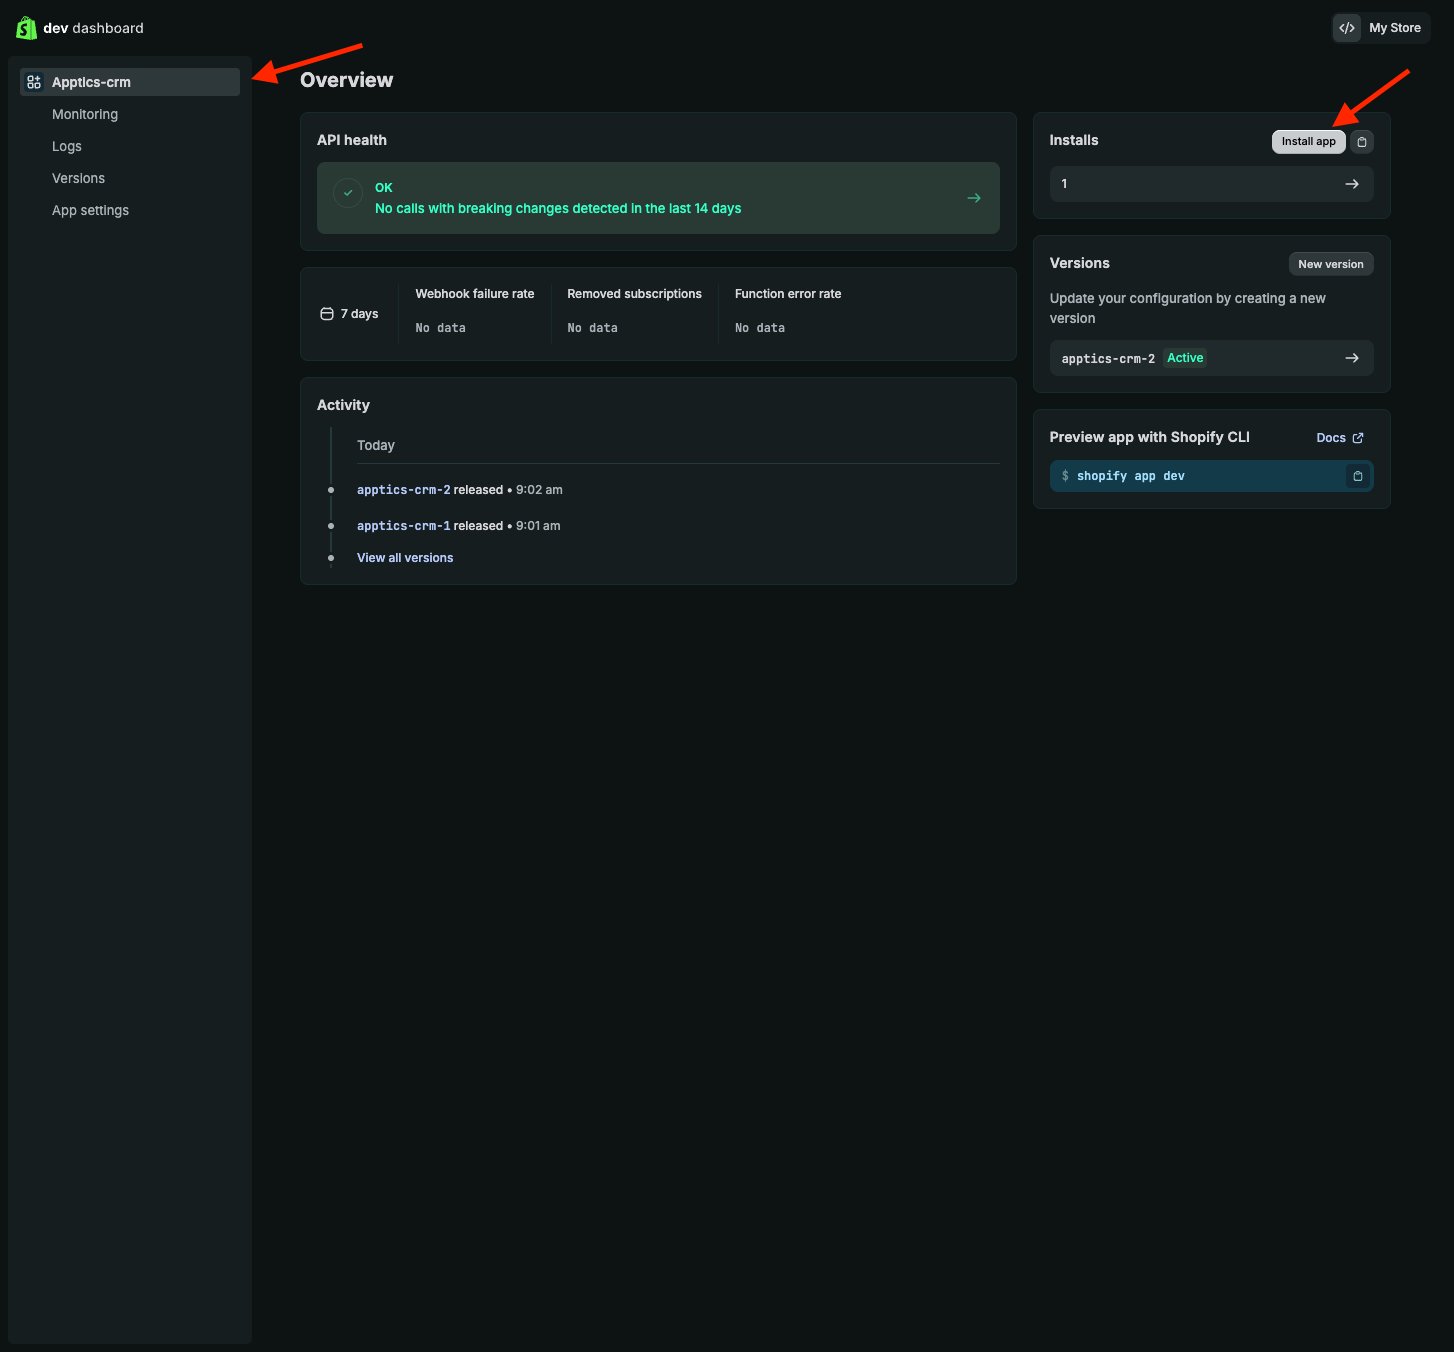
6. **Release** the version, then **install the app** on your store.
4. Under **API access**, paste the scopes:
```
read_products, read_customers, write_customers, read_orders, write_orders,
read_discounts, read_own_subscription_contracts,
write_own_subscription_contracts, read_online_store_navigation,
write_online_store_navigation, read_themes
```
and add the redirect URL
`https://api.apptics.com/api/auth/shopify/callback`.
5. Under **App proxy**, set subpath prefix `apps`, subpath `apptics`, and
proxy URL `https://api.apptics.com/apps/apptics`.
6. **Release** the version, then **install the app** on your store.
 ## Send the app's keys to Apptics
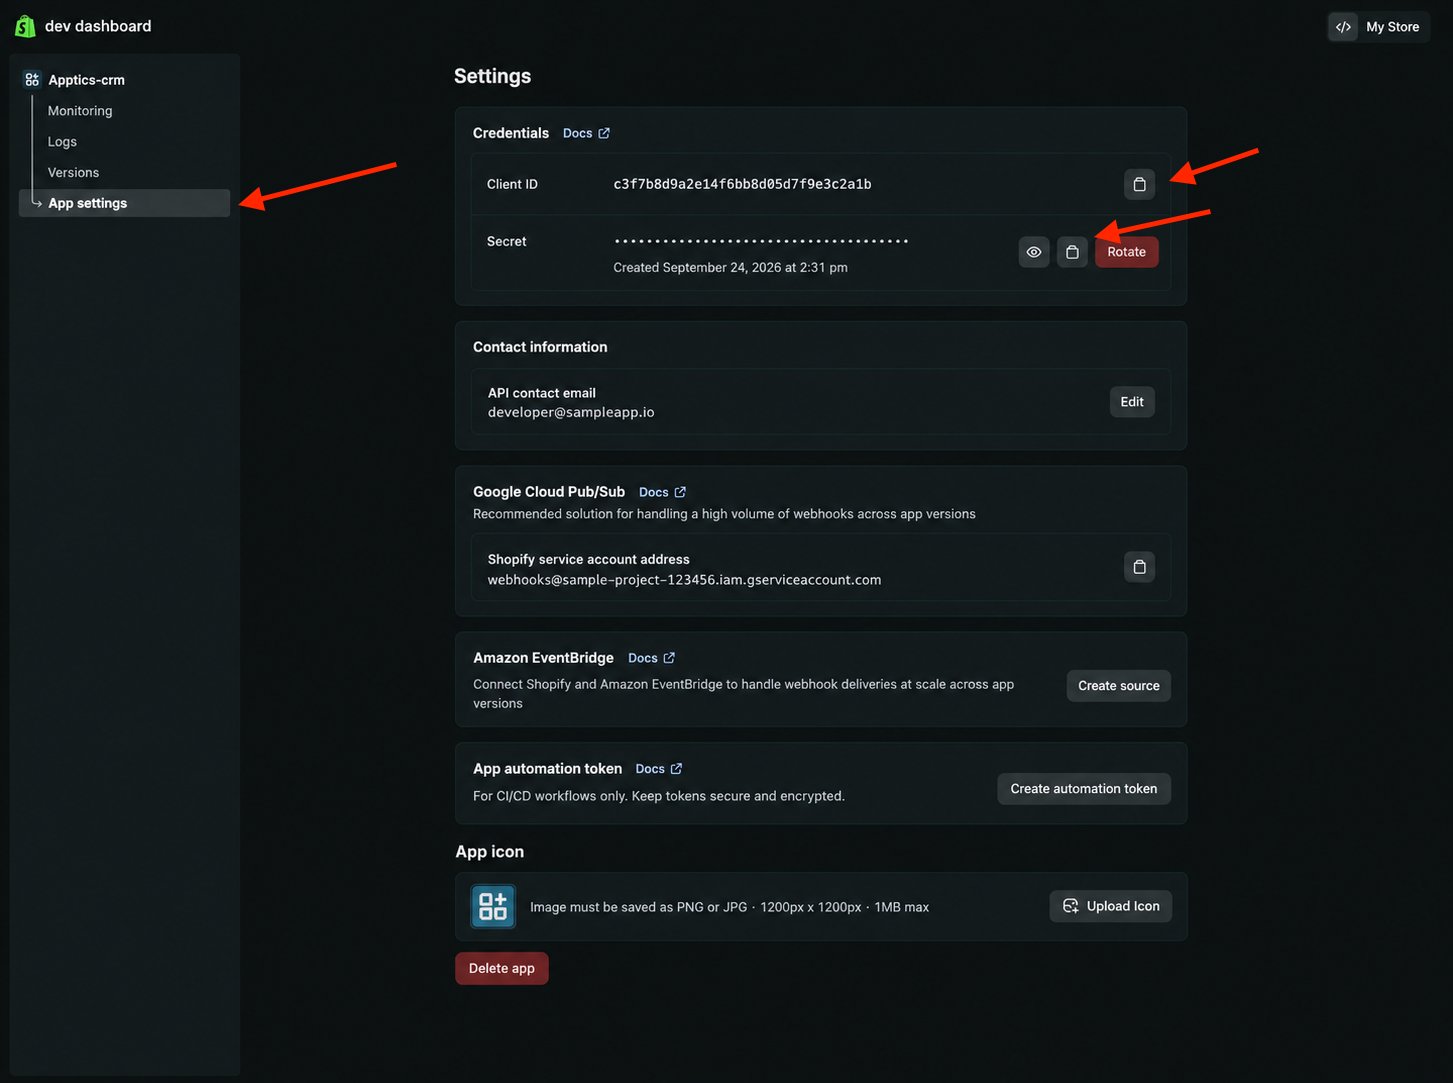
Copy the app's **Client ID** and **Client Secret** from its settings and send
them to the email address shown in the **Give Apptics access** step of the
Apptics window, together with your store domain.
## Send the app's keys to Apptics
Copy the app's **Client ID** and **Client Secret** from its settings and send
them to the email address shown in the **Give Apptics access** step of the
Apptics window, together with your store domain.
 Once Apptics has added them, the store connects on its own within a few
minutes, because the app is already installed. If the setup guide on your
dashboard still shows **Install** for the store, click it. Your products,
customers, and orders then start syncing.
## Add Apptics checkout to your theme by hand
An app you created yourself can't be switched on from the theme editor, so
add Apptics checkout to your theme directly:
1. In your Shopify admin, open **Online Store › Themes**, and on your live
theme choose **Edit code**.
2. Open `layout/theme.liquid` and paste this line just before ``:
```html theme={null}
```
3. Save the file.
Checkout clicks on your storefront now reach Apptics. In **Settings ›
Checkout**, the **Storefront connection** card keeps saying **Not turned
on**, but once a shopper has visited it shows when Apptics checkout was last
seen on your storefront — that's the confirmation to look for. Repeat the
paste whenever you publish a new theme.
This documentation is built and hosted on [Mintlify](https://mintlify.com), a developer documentation platform.
Once Apptics has added them, the store connects on its own within a few
minutes, because the app is already installed. If the setup guide on your
dashboard still shows **Install** for the store, click it. Your products,
customers, and orders then start syncing.
## Add Apptics checkout to your theme by hand
An app you created yourself can't be switched on from the theme editor, so
add Apptics checkout to your theme directly:
1. In your Shopify admin, open **Online Store › Themes**, and on your live
theme choose **Edit code**.
2. Open `layout/theme.liquid` and paste this line just before ``:
```html theme={null}
```
3. Save the file.
Checkout clicks on your storefront now reach Apptics. In **Settings ›
Checkout**, the **Storefront connection** card keeps saying **Not turned
on**, but once a shopper has visited it shows when Apptics checkout was last
seen on your storefront — that's the confirmation to look for. Repeat the
paste whenever you publish a new theme.
This documentation is built and hosted on [Mintlify](https://mintlify.com), a developer documentation platform.